Print
I often get the question – Why do my circles never appear like circles?
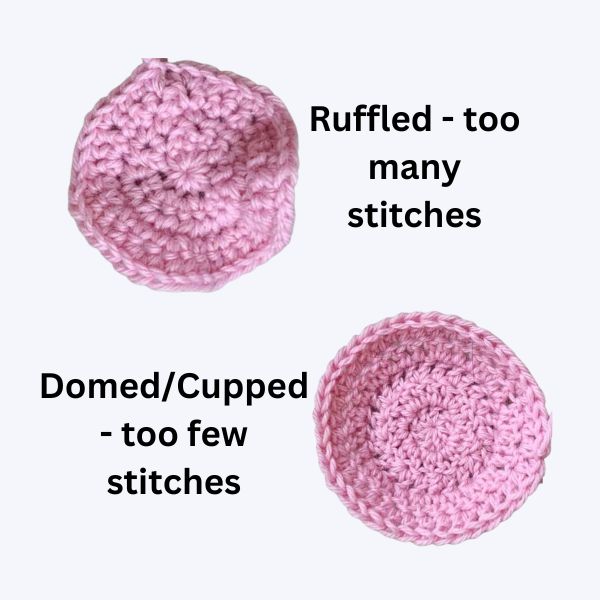
They are either ruffled, curled or have points. I have found there are three parts to getting the perfect circle.
- Begin the first round with the right amount of stitches. The taller your stitch the more stitches there should be in your first round. Too many stitches will lead to a ruffle, while too few will lead to a bowl – also referred to as domed/cupped.
 The following is the general rule:
– double crochet, start with 6—8 stitches
– half-treble, start with 10—12 stitches.
– treble, start with 12—14 stitches.
- In order to stay flat, each row needs to increase evenly. There is a formula to apply—every round must increase by the same number as stitches as you used in round one. Therefore if you began with 6 stitches, each round must increase by 6 stitches. And to ensure it resembles a circle these increases must be evenly spaced in the round. The rule applies as follows:
– round 2, increase in each stitch (two stitches into each stitch on round 1).
– for each subsequent row you then insert a single stitch between each increase. Therefore, in round 3, there will be one single stitch between each increase, in round 4 there will be 2 single stitches between each increase, round 5 there will be 3 single stitches between each increase, and so on.
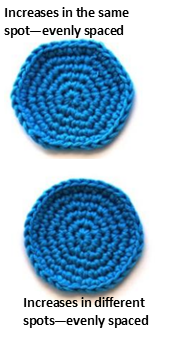
- In order to get your circle edges more rounded, vary where you make the increase in each row instead of increasing in the same spot. This will mean after round three, instead of beginning with an increase or the full number of single stitches, begin with either 1, 2, or 3 individual stitches, make the first increase then have the specified number of single stitches following the established rule until the last lot of single stitches. Rounds 3 to 4 may then look something like this:
Round 3 – increase, single stitch, increase, single stitch until the end.
Round 4 – single stitch, (increase, 2 single stitches, increase) until the last stitch, and make one single stitch.
Round 5 –increase, 3 single stitches, increase until the end
Round 6 – 2 single stitches (increase, 4 single stitches, increase) until the last 2 stitches and make 2 single stitches. This should result in your circle looking more even,
Many of the beautiful mandala patterns have already done the work for you, but if you like to cro-doodle, or design your own pattern, follow the above for an amazing result.