Print
Have you crocheted a garment, following the pattern precisely for your size only to find it doesn’t fit – it’s too tight or loose around the bust or arms, or too short or too long on the bodice or sleeves? It is very rare to find a pattern that fits exactly because we are all built differently. The sizing is an average. I myself find that most patterns are too long in the bodice and I need to make adjustments for a nice fit. Below are some tips and a link to more detailed articles, that I hope will help you create stylish and fitted garments.
-
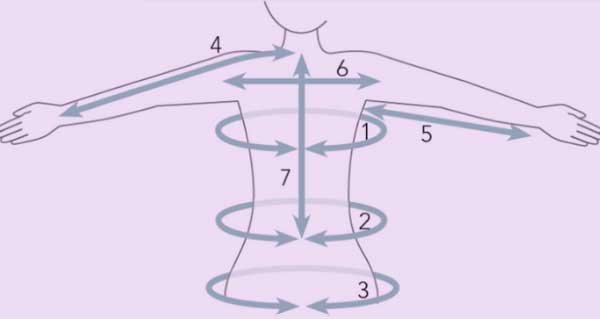
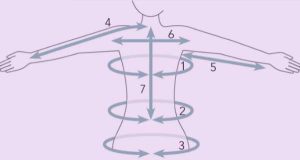
Preparation. Take measurements! It is a great idea to take your measurements and store them somewhere to refer to. And very important to get all of these if you are making the garment for someone else as you may not be able to do regularly fittings. Key measurements are: bust, waist, hips, centre neck to cuff, underarm to wrist, shoulder to shoulder, back to waist for tops. If making a skirt or dress you also want to measure waist to knees, and thighs.
- Select a size. Most patterns give a ‘to fit’ size being the recommended size based on your bust measurement. Do check what is said about the ease built into the pattern – whether or not it is a loose or tight fit. If you want a different fit, an adjustment will be needed to the pattern. If the pattern gives you the other measurements, compare them all to see if you will also need to make other adjustments to the pattern.
- Make a gauge swatch. I know this almost always seems like a waste of time, but it useful in the long run to achieve a fit you want. See our previous tip on ‘Swatches’ for how to do this. Take measurements before and after you wash (if you are going to wash it) or blocking, to see the difference in the measurements as this will affect your sizing and how much you adjust the patterns.
- Determine adjustments to the pattern. Yes you will need maths here. Read through the pattern and identify all the points where shaping occurs (increasing and decreasing). If you are looking to make the garment shorter/longer add/subtract rows before or after the shaping depending on where you need the length – use your gauge to determine how many rows. If you need it tighter or looser all over use a smaller/larger hook or if you want it tighter/looser in certain areas, do more/less decreases during the shaping section. This is where your gauge swatch will help you. Once you know your stitches per inch, and rows per inch, you can calculate how many more/less stitches you will need during your shaping and how many more/less rows you need to make.
Interweave have a good article on how to use your gauge swatch to adjust the patterns – including the equations and calculations you will need. (while written for knitting it applies to crochet as well). Read it here. And if you ever come across Doris Chan books keep an eye out for how she discusses shaping garments to fit – she has a wealth of knowledge and tips and techniques to apply – far too many to include here. Sadly her books are hard to come by. Some of her patterns are on ravelry which include some discussion of shaping techniques.